Monday, January 25, 2010

Budget Friendly Bathroom Remodel

In one days time and under $100 spent. A small bathroom gets a great makeover.


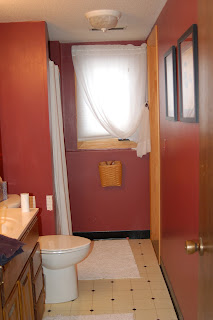
The client wanted a new look that wouldn't cost a lot of money. Client concerns: Baby blue existing shower tile which is not being replaced at the current time. Black & white existing vinyl flooring which is also not being replaced at the current time.


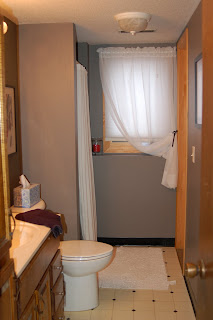
We removed a cabinet over the commode. This produced a more open feeling. There were too many pieces of cabinetry in a small amount of space and the homeowner did not use the cabinet removed so there was no loss of storage space.


The rustic red wall color was replaced by "Mink" a medium tone gray color. This cooler color complements the black and white existing vinyl flooring. It also better complements the existing baby blue shower tile. The tile is not usually visible with help from a shower curtain.


The new wall color seems to "brighten" the space.


An outdated wooden toilet paper holder was removed, relocated, and replaced with a satin nickel finish replacement on the side of the vanity. The dated faucet was also replaced with a new satin nickel finish. The old brass, cabinet hardware was also replaced with modern satin nickel hardware.

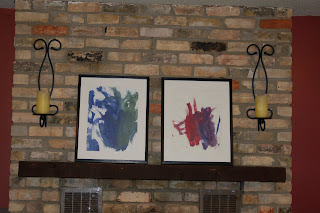
A piece of custom artwork done by the client's son is used over the commode. Existing artwork, rugs, window treatments, shower curtain, and accessories were re-used.


Project Costs
1 Gallon Paint $24 - Faucet $35 - Hardware $14 - Toilet Paper holder $10

Total Project Cost = $83 and one days time. Not bad!

I would love to help you with your remodeling project on a budget.
Email me with your design questions. brynnalden@yahoo.com

Saturday, October 10, 2009

What is your color personality?

Good morning all!

Not sure what the weather is where you are, but here in the St. Paul Area, we woke up to snow on the ground on Monday morning! Wow! Welcome to living in the Midwest!
Today let's talk color! I ran across a great issue of House Beautiful and there were so many sources on color personalities that it prompted this post.
Everyone has a "color personality." Do you know what yours is? Depending on who you ask, or where you do your research, you might have a couple different answers to that question.

I can guess mine, but in all honesty, it depends on the day. If you were to glance around my home at my interior, my color personality will lean toward warm, rich, and deep colors. I use alot of deep eggplant, rustic red, chocolate brown, and caramel to name a few of the colors. I like to accessorize with black but also veer sometimes.

I think a good designer can pull in different items and make one cohesive look. Shall we say, eclectic? The safest thing one can do, is match. Thats why people match. It is safe! They know it looks good! (What was that slight whisper in my ear? - Oh yeah, matching is also, shhhh, whisper, - BORING.)

Go into any of the furniture stores. Look around? What do you see? I know, matching sets of everything. Matching sofa, loveseat, and chair combinations. Matching occasional table sets. Even matching headboard, bedside tables, and case pieces. Get over the matching!

According to color expert Leatrice Eiseman (morealivewithcolor.com), you can categorize your homes color personality into the following four color times: Sunrise, Sunset, Sunlight, and Crossovers. Check out the description and decide which is your best "color time!"

Sunrise: Your decorating palette veers toward the cool colors and is inspired by natural elements such as air and water. Your interior decorating palette will sparkle and shine with tones of amethyst, orchid, emeralds, and royal blues. Cool grays, mauvey-taupes, and rosey-beiges are good neutrals for a "sunrise" palette. The best white for a "sunrise" is pure white - taken from the pure white of snow.

Sunset: A "Sunrise's" decorating palette moves toward the warn color spectrum and is inspired by such natural elements as fire and earth. Your interior palette will include terra-cotta, ginger, burnt coral, apricot, and caramel colors. You can also flash some of the exotic colors such as iris, orchid, and deep periwinkle. Your neutrals are warm taupes and camel tones. The best white for you is a warm white.

Sunlight: As a sunlight, you will pull from both the Sunrise and Sunset color palettes. All of the elements are present. Air, Fire, Water, and Earth. Great colors for a "sunlight's" interior palette would include custards and peaches. You might also choose a delft blue or cornflower. For a visual, "Think of verdant green meadows under a placid blue sky. The best neutrals for a Sunlight are taupes and the best whites have pastel undertones to them.

Crossovers: A crossover palette is most often referred to as the "basic" or "classic" scheme. A crossover has great basic neutrals like sand, khaki, taupe and gray. Crossovers are the most versatile and can be used in any combination of any of the other color time palettes. Crossover, your best colors are in the deep tones. Chocolate browns, eggplant, wine, teal, navy blues and black as an accent color for you. Crossovers, like the deep tones for adding richness. The best white is off'white.

From the looks of my home; I would categorize my color time palette as somewhere between a sunset and a crossover. Probably a 50-50 split. I love the deep colors but I also love the warm reds, and carmels too. There is no right or wrong to the theory of color personalities. Just like there is no right or wrong to choosing a name. It just fits!
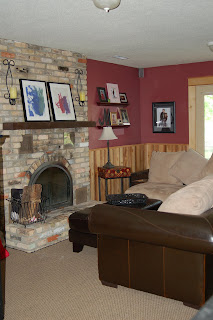

Source: House Beautiful - September 2009
Mickelson Residence - Lower Level Family Room

Wednesday, September 23, 2009

Choosing Paint


Good Morning! Wow - I can't believe its the end of September already.

Earlier in the month, I finished a paint job for a friend. I was using Sherwin Williams brand paint and wow, what a difference. It went on like butter on warm toast! I was absolutely amazed. I have always used other brands in my own home. I do paint a lot though! I mean A LOT!

I have previously used the no VOC paint from Sherwin Williams and it was nice too. The VOC's (volatile organic compounds) are what makes the paint adhere to the surface and make it durable. They are also what make paint smell. For those of you with sensitive noses, the no VOC paints are awesome. My client happened to be very sensitive to scents. It is great for not emitting odors. However, it is very thin, almost watery, compared to its older brother, but it did go on very nicely.


Up until this job, I guess I hadn't paid attention to the difference between paint brands. Now I do. If you are just wanting a quick in-expensive cover up for a re-sale or secondary space like a closet or garage etc, then by all means use what ever is the least expensive. If you are painting something to last the duration, I highly recommend Sherwin Williams paints. They are a little more pricey, but oh so worth it.


Here are pics from the Gonko residence in Cottage Grove, which I finished earlier in the month. The before and after are amazing! The colors are beautiful! Abby did a nice job selecting her palette. The red wall says, "WOW"! Great job Abby. This is a great example of using color and dark colors in a space! LOVE IT! The paints are Sherwin Williams.
If you are planning a darker color like the dark brown or red, plan on three coats of paint. Especially if going over a lighter color. A tinted primer will cut out one of the coats, but you are still painting on a primer. 50 - 50 tradeoff! The lighter beige color covered in two coats. Almost one, but there were patchy areas so two coats were needed. I just think it looks great! Happy Painting!

Thursday, August 20, 2009

Cute Girls Room Idea

Good morning! It is nice to have a raing day to get some work done!

I was helping my friend with her daughter's room and decided it would be a nice topic for this week.

She has a wallpaper border which her 9 year old daughter insists on using. Afterall, it is her room! I am not a huge border fan, but it's not my room. We are playing off the colors in the border. As you can see, there are oranges, fuschia, purple, yellow, blue, lime green, etc, in the border. Many colors to pick from.


My friends daughter likes lime green and blue and had mentioned she wanted to possibly use one of those colors on the wall. When my friend brought the border over, I thought of using both the lime green and blue and then adding in a third color and here they are. I added the third color as a background for the border since it is a cutout. I did a quick sketch of the design idea as it is still in the planning phase. I will post photots once the project is finished.


Kids' rooms are a great place to let your creative juices flow. Don't hold back. Use the bright colors and add the fun accents. Even without the border this color scheme is a fun one. Happy Thursday!


Monday, August 10, 2009

Wood - To paint or not to paint?

Good morning all!

I had a conversation with a friend of mine this weekend while she showed me around her new home. She showed me the paint colors she had picked out for the walls, and said she wanted to paint the mantel around the fireplace as well. Her husband is not so inclined on this matter. So, I was prompted for todays topic of painting wood.

Basically, this is a very personal matter. Years back, when I was an intern and then design assistant, the designer I worked for was always painting wood work. I was kind of taken back by it. Ever since I can remember, it is taboo to paint any woodwork, furniture, trim, or otherwise. I am not even sure where that came from to be honest, but that was instilled in my head. Maybe it came from my grandpa who was a carpenter. Now, I have my own home, and guess what, I paint wood work. Shhhhhh! Don't tell!

I have painted floor trim, window trim, door frames, kitchen cabinets, bathroom vanities, and yes of course, furniture. You can look at it this way, do you want to spend $300 on a new dresser? or $30 on a gallon of semi-gloss paint? If you give it a coat of paint, can you breath new life into it? My answer is yes! What have you got to lose? A whoppin $30 and your time.
Many people are against painting wood work and I am not quite sure why. I am not saying run through your house with a paint brush and paint all the wood. However, if you don't absolutely love the dresser(or any other piece), and it is most likely going to sit in the garage for the next 5 years, then what do you have to lose? Is it doing any good sitting in the corner of the garage? Worst case scenario, you don't like the paint. So what? Then it goes in the corner of the garage anyway and waits for the next garage sale.
Wood trim, look in any magazine, design book, or at any design show, you will see painted trim, and woodwork. Like I said before, it is a personal decision. There is no right or wrong. So don't let anyone tell you differently. Actually, painting woodwork, and furniture is a better option of re-use than throwing it out and getting new! My philosophy, if you already don't like it, then what do you have to lose? Nothing, but you have everything to gain. Try it, you might like it!


This is a dresser I painted for my son about 7 years back, its over 40 years old. It was my brother's way back when and my mom was going to toss it. Well, guess what? I added paint distressed it a bit and new hardware and it will last several more years. It won't last forever, but it looks good and is practical and is serving its purpose.


This desk was free on the side of the road. Of course, I picked it up. The top was rotted and damaged, so I replaced the top with a new piece of plywood, painted it black and switched out the hardware. Voila! I have a desk straight out of one of the trendy home furnishings catalog. It cost me only $50 (that was with the hardware, paint, and plywood). It could have cost me less, if I hadn't switched out the hardware.
So, go ahead, paint the wood, furniture, trim, mantel, doors, if you would rather tear it out, or toss it rather than live with it, try painting it. You never know, you might love it!
Oh, and by the way, Abby, paint the mantel! :) Talk to you soon!

Monday, August 3, 2009

Artwork

Good Morning!

While standing at the top of my friend Pam's stairwell, I realized she had all these wonderful blank white walls. Our conversation prompted this post!


If you have blank walls, white or otherwise, I am going to help you fill them. If you are a saver like me, and you have kids, then you have art in OVER abundance. If you are sans kids, then you might have to do a little more work, but never the less, you still can get GREAT artwork on the cheap.


1- Make a photo gallery. Use family photos and make your own photo gallery. This can be done in a couple of different ways. Find a common denominator. i.e. Use the same color frame, all black and white photos, all the same size, etc. Once you have your common denominator, start grouping your photos. Hallways and stairwell walls are great for these arrangements because there are usually long walls and great for larger sized pieces. I am a more symmetrical kind of girl, (at least today), so I tend to position my gallery photos symmetrically. There is no right or wrong, it is a personal decision, depending on your personal preference.


I like to buy black frames at garage sales, and second hand stores such as Goodwill, I keep them on hand for when I need a frame for a new piece of art. I also keep a list of sizes that I am in need of. Then when I come accross them, I know what size I specifically need. Of course, you can always buy new. However, I try to reduce, re-use, and recycle as much as possible. Sustainable, green design!!!


2- Kids artwork. Frame your kids' artwork and use it as unique artwork. You can also buy inexpensive canvases at your local art supply store, ours is JoAnn's or Michael's (they usually have coupons in the Sunday paper for 40% off too). Give your kids the brushes, paints, and water, and let them create their own masterpiece. A helpful hint, make sure they paint the edges around the canvas. :)


If you don't have little kids, enlist your nieces and nephews or grandkids into creating a masterpiece for your blank wall.


3- Nostalgic pieces. Take that old calendar you have been saving. Take it apart and use the prints on your walls, again in frames of the same color. Remember those old theatre programs, frame those and use them in your guest room. How about that old sheet music you found cleaning your great grandma's house? Use that too! Nostalgic pieces make for great conversation starters too.

Good luck on your artwork search. We'll talk soon. Happy Monday!


Friday, July 31, 2009

On a budget?

Good morning!!
Want a new look? On a budget? Try re-arranging. Re-purpose things you already own. Move a peice of artwork from your bedroom to the living room. Re-purpose a chest of drawers as linen storage in the dining room.


There are many, many ways to change the look of a space without breaking your piggy bank. Remember that old side table in the garage rafters? Take it out, put a coat of black paint on it, and presto change-o, you have a new side table for your guest room! You know that mirror down in the storage under the stairs? Take it out, add a coat or two of black paint, voila!, use it in your entry way. Mirrors placed properly in your entry will re-route negative energy, according to some feng shui experts.


This is an antique side board I had in my garage. I painted it black and now it is in my family room and houses games and puzzles. It is also great for one collection of family photos.

Oh, remember that old book case down in the garage? Add a coat of white or pink or yellow paint. Add some cute baskets and use it in your daughters room for toy storage! Take those bi-fold doors off her closet as well, paint the inside of the closet a fresh coat of paint (I like using a different color than the walls) and redo the shelving, add some storage bins or baskets. You'll be amazed at how much space you gain from removing bi-fold doors.


This is my daughters closet. I removed the bi-fold doors and did my own custom closet design. I painted the inside yellow and added baskets and bins for storage but I gained approx. 4 sq. ft by removing the doors. I also added hooks on the wall for hats, bags, etc


You will be amazed at what you can find shopping around your house, once you actually start looking! Happy Shopping!